计算图的概念
PNNX是PyTorchNeural Network Exchange的缩写,其愿景是能够将PyTorch模型文件直接导出为高效、简洁的计算图。
Graph: 有多个Operator串联得到的有向无环图,规定了各个计算节点(Operator)执行的流程和顺序。
Layer: 计算节点中运算的具体执行者,Layer类先读取输入张量中的数据,然后对输入张量进行计算,得到的结果存放到计算节点的输出张量中,当然,不同的算子中Layer的计算过程会不一致。
Tensor: 用于存放多维数据的数据结构,方便数据在计算节点之间传递,同时该结构也封装矩阵乘、点积等与矩阵相关的基本操作。
ONNX的诟病
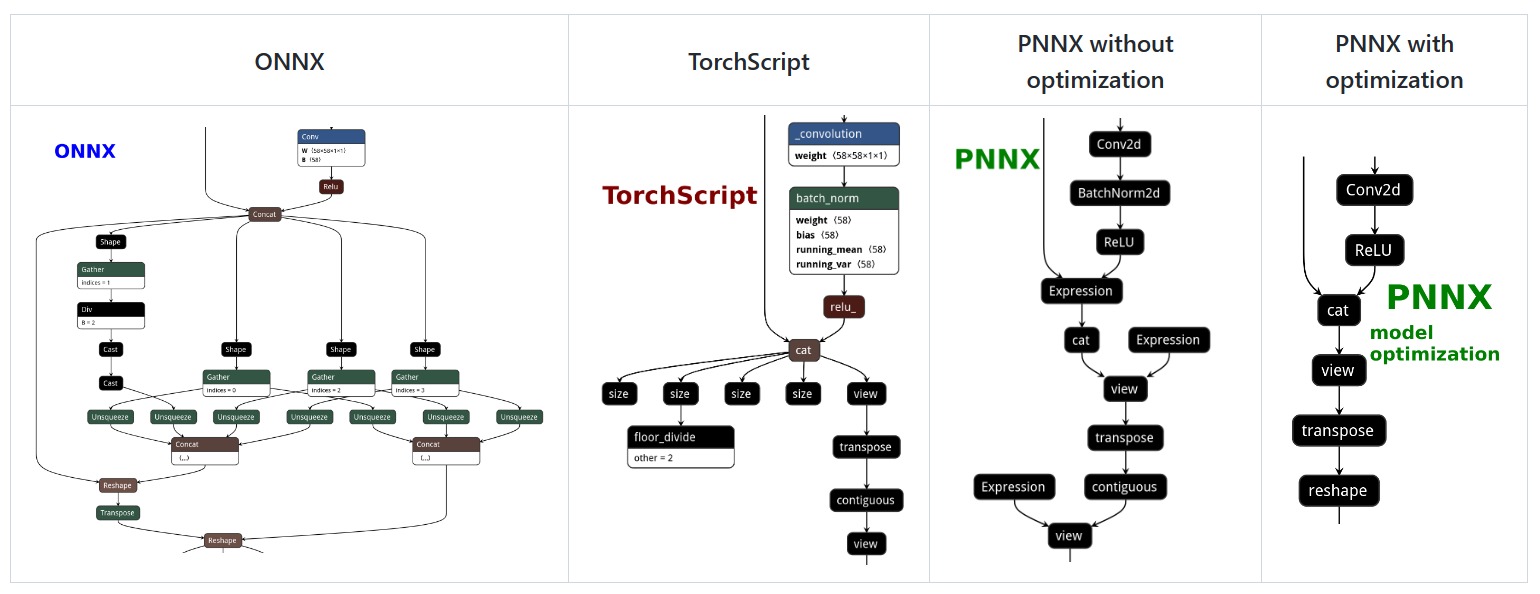
ONNX不具有良好的可读性和编辑性,让用户很难修改计算图和自定义相关算子
ONNX定义的算子和Pytorch并不是保持一致的,当把Pytorch模型导出为ONNX时,会出现很多额外的琐碎的算子,这无疑增加了推理的成本
ONNX中有大堆额外的参数用来和众多的机器学习框架相适应,这无疑增加了模型推理时的软硬件成本
PNNX算子
可视化ONNX,TorchScript,PNNX导出的算子,Pytorch源码如下
import torch
import torch.nn as nn
class Focus(nn.Module):
# Focus wh information into c-space
def __init__(self, c1, c2, k=1, s=1, p=None, g=1, act=True): # ch_in, ch_out, kernel, stride, padding, groups
super().__init__()
self.conv = Conv(c1 * 4, c2, k, s, p, g, act)
def forward(self, x): # x(b,c,w,h) -> y(b,4c,w/2,h/2)
return self.conv(torch.cat([x[..., ::2, ::2], x[..., 1::2, ::2], x[..., ::2, 1::2], x[..., 1::2, 1::2]], 1))
PNNX 模型优化
pnnx.param的格式
7767517
4 3#操作符个数 操作数个数
pnnx.Input pnnx_input_0 0 1 0 #0=(1,32)f32
nn.Linear linear 1 1 0 1 bias=True in_features=32 out_features=128 @bias=(128)f32 @weight=(128,32)f32 #0=(1,32)f32 #1=(1,128)f32
F.sigmoid F.sigmoid_0 1 1 1 2 $input=1 #1=(1,128)f32 #2=(1,128)f32
pnnx.Output pnnx_output_0 1 0 2 #2=(1,128)f32
[type] [name] [input count] [output count] [input operands] [output operands] [operator params]
输入操作数:所有输入blob名称的名称列表,用空格分隔
输出操作数:所有输出blob名称的名称列表,用空格分隔
运算符参数:键值对列表,用空格分隔,运算符权重以@符号为前缀,张量形状以#符号为前缀,输入参数键以$符号为前缀
pnnx.bin的格式
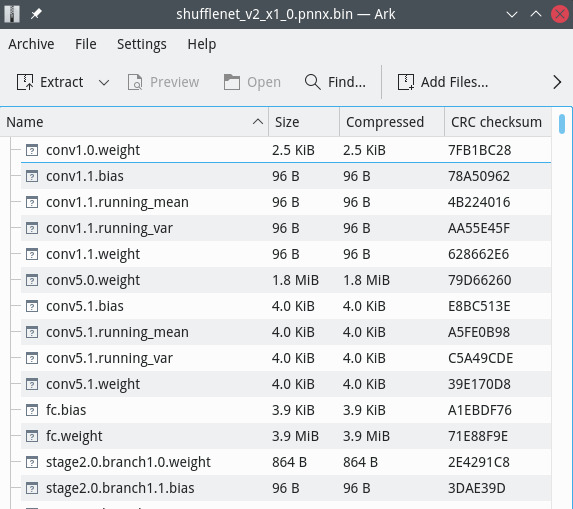
二进制权重文件是由相应的算子名称和权重名称构成
举例来说, nn.Conv2d conv_0 1 1 0 1 bias=1 dilation=(1,1) groups=1 in_channels=12 kernel_size=(3,3) out_channels=16 padding=(0,0) stride=(1,1) @bias=(16) @weight=(16,12,3,3)
会将 conv_0.weight 和 conv_0.bias 放到 pnnx.bin zip 压缩包中
辅助类
先介绍两个辅助类:StoreZipReader,StoreZipWriter分别用于压缩文件的读取和写入
取消字节对齐
// https://stackoverflow.com/questions/1537964/visual-c-equivalent-of-gccs-attribute-packed
#ifdef _MSC_VER
#define PACK(__Declaration__) __pragma(pack(push, 1)) __Declaration__ __pragma(pack(pop))
#else
#define PACK(__Declaration__) __Declaration__ __attribute__((__packed__))
#endif
__attribute__ ((__packed__))
关键字,它可以做到让我们的结构体,按照紧凑排列的方式,占用内存。
#include <stdio.h>
#include <iostream>
using namespace std;
struct test1 {
char c;
int i;
};
struct __attribute__ ((__packed__)) test2 {
char c;
int i;
};
int main()
{
cout << "size of test1:" << sizeof(struct test1) << endl;
cout << "size of test2:" << sizeof(struct test2) << endl;
}
/*
运行结果:
size of test1:8
size of test2:5
*/
显而易见,test1结构体里面没有加关键字,它采用了4字节对齐的方式,即使是一个char变量,也占用了4字节内存,int占用4字节,共占用了8字节内存,这在64位机器当中将会更大。 而test2结构体,再加上关键字之后,结构体内的变量采用内存紧凑的方式排列,char类型占用1字节,int占用4字节,总共占用了5个字节的内存。
为了让数据结构以最优的方式存储,处理,保证读写数据结构都一一对齐,我们往往采用3种方式:
1.程序作者,手动对齐,将数据按从小到大的顺序排列,尽量凑齐。
2.使用#pragma pack (n)来指定数据结构的对齐值。
3.使用 __attribute__ ((packed))
,让编译器取消结构在编译过程中的优化对齐,按照实际占用字节数进行对齐,这样子两边都需要使用 __attribute__ ((packed))
取消优化对齐,就不会出现对齐的错位现象。
相关结构体
zip格式压缩包主要由三大部分组成:数据区
、中央目录记录区(也有叫核心目录记录)
、中央目录记录尾部区
PACK(struct local_file_header {// 数据区
uint16_t version;
uint16_t flag;
uint16_t compression;
uint16_t last_modify_time;
uint16_t last_modify_date;
uint32_t crc32;
uint32_t compressed_size;
uint32_t uncompressed_size;
uint16_t file_name_length;
uint16_t extra_field_length;
});
PACK(struct central_directory_file_header {// 中央目录记录区(也有叫核心目录记录)
uint16_t version_made;
uint16_t version;
uint16_t flag;
uint16_t compression;
uint16_t last_modify_time;
uint16_t last_modify_date;
uint32_t crc32;
uint32_t compressed_size;
uint32_t uncompressed_size;
uint16_t file_name_length;
uint16_t extra_field_length;
uint16_t file_comment_length;
uint16_t start_disk;
uint16_t internal_file_attrs;
uint32_t external_file_attrs;
uint32_t lfh_offset;
});
PACK(struct end_of_central_directory_record {// 中央目录记录尾部区
uint16_t disk_number;
uint16_t start_disk;
uint16_t cd_records;
uint16_t total_cd_records;
uint32_t cd_size;
uint32_t cd_offset;
uint16_t comment_length;
});
Zip格式结构图总览
CRC循环冗余校验
static uint32_t CRC32_TABLE[256];
static void CRC32_TABLE_INIT()
{
for (int i = 0; i < 256; i++)
{
uint32_t c = i;
for (int j = 0; j < 8; j++)
{
if (c & 1)
c = (c >> 1) ^ 0xedb88320;//执行右移一位并与 CRC32 多项式 0xEDB88320 异或操作
else
c >>= 1;
}
CRC32_TABLE[i] = c;
}
}
static uint32_t CRC32(uint32_t x, unsigned char ch)
{
return (x >> 8) ^ CRC32_TABLE[(x ^ ch) & 0xff];
}
static uint32_t CRC32_buffer(const unsigned char* data, int len)
{
uint32_t x = 0xffffffff;
for (int i = 0; i < len; i++)
x = CRC32(x, data[i]);
return x ^ 0xffffffff;
}
CRC 算法的基本思想是将传输的数据当做一个位数很长的数。将这个数除以另一个数。得到的余数作为校验数据附加到原数据后面。
实际应用时,发送方和接收方按以下方式通信:
发送方和接收方在通信前,约定好一个预设整数作为除数。
发送方在发送前根据原始数据和约定好的除数进行模二除法(按位异或)运算生成余数(即CRC码),然后将其附加到原始数据后面一起发送给接收方。
接收方收到后将其模二除以约定好的除数,当且仅当余数为0时接收方认为没有差错。
示例 假设要传输的原始数据为1101011011B,发送方和接收方在通信前约定好的除数为10011B。由于除数10011B是五位数(5bit),那么假设余数(即CRC码)为四位数(4bit)。因为现在余数未知,所以在进行模二除法运算前先将余数设为0000B,即待发送的数据为11010110110000B。下面开始进行模二除法运算来确定余数(即CRC码):
可见余数(即CRC码)为1110B,因此发送方实际发送的是11010110111110B。接收方在接收后需要将其模二除以10011B来进行CRC校验:
可见余数为0,因此本次通信没有差错。
StoreZipReader
class StoreZipReader
{
public:
StoreZipReader();
~StoreZipReader();
int open(const std::string& path);
size_t get_file_size(const std::string& name);//通过name获取压缩包中某个文件的大小
int read_file(const std::string& name, char* data);//通过name获取压缩包中某个文件,并将其存入data
int close();
private:
FILE* fp;
struct StoreZipMeta
{
size_t offset;
size_t size;
};
std::map<std::string, StoreZipMeta> filemetas;
};
重点说下open这个函数
int StoreZipReader::open(const std::string& path)
{
close();
fp = fopen(path.c_str(), "rb");
if (!fp)
{
fprintf(stderr, "open failed\n");
return -1;
}
while (!feof(fp))
{
// peek signature
uint32_t signature;
int nread = fread((char*)&signature, sizeof(signature), 1, fp);
if (nread != 1)
break;
if (signature == 0x04034b50)
{
local_file_header lfh;
fread((char*)&lfh, sizeof(lfh), 1, fp);
if (lfh.flag & 0x08)
{
fprintf(stderr, "zip file contains data descriptor, this is not supported yet\n");
return -1;
}
// lfh.compression=0代表不采取压缩
if (lfh.compression != 0 || lfh.compressed_size != lfh.uncompressed_size)
{
fprintf(stderr, "not stored zip file %d %d\n", lfh.compressed_size, lfh.uncompressed_size);
return -1;
}
// file name
std::string name;
name.resize(lfh.file_name_length);
fread((char*)name.data(), name.size(), 1, fp);
// skip extra field
fseek(fp, lfh.extra_field_length, SEEK_CUR);
StoreZipMeta fm;
fm.offset = ftell(fp);
fm.size = lfh.compressed_size;
filemetas[name] = fm;
// fprintf(stderr, "%s = %d %d\n", name.c_str(), fm.offset, fm.size);
fseek(fp, lfh.compressed_size, SEEK_CUR);
}
else if (signature == 0x02014b50)
{
central_directory_file_header cdfh;
fread((char*)&cdfh, sizeof(cdfh), 1, fp);
// skip file name
fseek(fp, cdfh.file_name_length, SEEK_CUR);
// skip extra field
fseek(fp, cdfh.extra_field_length, SEEK_CUR);
// skip file comment
fseek(fp, cdfh.file_comment_length, SEEK_CUR);
}
else if (signature == 0x06054b50)
{
end_of_central_directory_record eocdr;
fread((char*)&eocdr, sizeof(eocdr), 1, fp);
// skip comment
fseek(fp, eocdr.comment_length, SEEK_CUR);
}
else
{
fprintf(stderr, "unsupported signature %x\n", signature);
return -1;
}
}
return 0;
}
回顾C语言文件处理函数
size_t fread(void *ptr, size_t size, size_t count, FILE *stream);
其中,ptr是指向缓冲区的指针,size是要读取的每个元素的大小(以字节为单位),count是要读取的元素个数,stream是文件指针。例如,要读取一个包含100个int类型变量的数据块,可以这样调用fread函数:
fread(buffer, sizeof(int), 100, fp);
这将从文件中读取100个int类型变量到缓冲区中。
ftell
函数用于获取文件指针的当前位置。它的原型如下:
long int ftell(FILE *stream);
stream
:文件指针,是一个指向 FILE
对象的指针,通常通过 fopen
函数获得。
ftell
函数返回当前文件指针的位置作为一个长整数(long int
)。一般情况下,返回值表示从文件的起始位置到当前文件指针的字节数偏移量。
fseek
函数用于设置文件指针的位置,即将文件流中的读/写位置设置到指定的位置。它的原型如下:
int fseek(FILE *stream, long int offset, int origin);
stream
:文件指针,是一个指向 FILE
对象的指针,通常通过 fopen
函数获得。
offset
:偏移量,即要设置的相对位置。正值表示向文件末尾方向移动,负值表示向文件开始方向移动。
origin
:起始位置,可以是以下值之一:
SEEK_SET
:从文件开始位置计算偏移,offset
必须是非负值。
SEEK_CUR
:从当前位置计算偏移,offset
可以是负值。
SEEK_END
:从文件末尾位置计算偏移,offset
可以是负值。
例如,如果要将文件指针设置到文件开头,可以使用:
fseek(fp, 0, SEEK_SET);
这将把文件指针 fp
移动到文件的起始位置。如果要将文件指针向后移动 10 个字节,可以使用:
fseek(fp, 10, SEEK_CUR);
如果要将文件指针设置到文件末尾前 20 个字节处,可以使用:
fseek(fp, -20, SEEK_END);
在使用 fseek
函数时,需要注意的一点是,该函数可能返回一个非零值,表示操作失败。你可以使用 ftell
函数来获取当前文件指针的位置。
fwrite
是一个用于将数据块写入文件的C标准库函数。它的声明如下:
size_t fwrite(const void *ptr, size_t size, size_t count, FILE *stream);
这个函数的作用是将位于 ptr
指向的内存块中的数据写入 stream
指向的文件中。参数说明如下:
stream
: 指向要写入的文件的 FILE
指针。
一些标志位的含义
用来存放本地文件头标识:0x04034b50
,用于解压时候,读取判断文件头的开始
如果lfh.flag
的第四个bit位等于1,则本地头部的crc-32、压缩大小和未压缩大小字段被设置为零
记录核心目录文件头标识:0x02014b50
,用于解压时候,查找判断是否是中央目录的开始位置
中央目录记录尾部开头标记:0x06054b50
,用于解压时,查找判断中央目录尾部的起始位置
StoreZipWriter
class StoreZipWriter
{
public:
StoreZipWriter();
~StoreZipWriter();
int open(const std::string& path);
int write_file(const std::string& name, const char* data, size_t size);
int close();
private:
FILE* fp;
struct StoreZipMeta
{
std::string name;
size_t lfh_offset;
uint32_t crc32;
uint32_t size;
};
std::vector<StoreZipMeta> filemetas;
};
重点是write_file
和close
这两个函数,存储元数据并定义压缩包关键字段的值
int StoreZipWriter::write_file(const std::string& name, const char* data, size_t size)
{
int offset = ftell(fp);
uint32_t signature = 0x04034b50;
fwrite((char*)&signature, sizeof(signature), 1, fp);
uint32_t crc32 = CRC32_buffer((const unsigned char*)data, size);
local_file_header lfh;
lfh.version = 0;
lfh.flag = 0;
lfh.compression = 0;
lfh.last_modify_time = 0;
lfh.last_modify_date = 0;
lfh.crc32 = crc32;
lfh.compressed_size = size;
lfh.uncompressed_size = size;
lfh.file_name_length = name.size();
lfh.extra_field_length = 0;
fwrite((char*)&lfh, sizeof(lfh), 1, fp);
fwrite((char*)name.c_str(), name.size(), 1, fp);
fwrite(data, size, 1, fp);
StoreZipMeta szm;
szm.name = name;
szm.lfh_offset = offset;
szm.crc32 = crc32;
szm.size = size;
filemetas.push_back(szm);
return 0;
}
int StoreZipWriter::close()
{
if (!fp)
return 0;
int offset = ftell(fp);
for (const StoreZipMeta& szm : filemetas)
{
uint32_t signature = 0x02014b50;
fwrite((char*)&signature, sizeof(signature), 1, fp);
central_directory_file_header cdfh;
cdfh.version_made = 0;
cdfh.version = 0;
cdfh.flag = 0;
cdfh.compression = 0;
cdfh.last_modify_time = 0;
cdfh.last_modify_date = 0;
cdfh.crc32 = szm.crc32;
cdfh.compressed_size = szm.size;
cdfh.uncompressed_size = szm.size;
cdfh.file_name_length = szm.name.size();
cdfh.extra_field_length = 0;
cdfh.file_comment_length = 0;
cdfh.start_disk = 0;
cdfh.internal_file_attrs = 0;
cdfh.external_file_attrs = 0;
cdfh.lfh_offset = szm.lfh_offset;
fwrite((char*)&cdfh, sizeof(cdfh), 1, fp);
fwrite((char*)szm.name.c_str(), szm.name.size(), 1, fp);
}
int offset2 = ftell(fp);
{
uint32_t signature = 0x06054b50;
fwrite((char*)&signature, sizeof(signature), 1, fp);
end_of_central_directory_record eocdr;
eocdr.disk_number = 0;
eocdr.start_disk = 0;
eocdr.cd_records = filemetas.size();
eocdr.total_cd_records = filemetas.size();
eocdr.cd_size = offset2 - offset;
eocdr.cd_offset = offset;
eocdr.comment_length = 0;
fwrite((char*)&eocdr, sizeof(eocdr), 1, fp);
}
fclose(fp);
fp = 0;
return 0;
}
PNNX中的图结构(Graph)
class Graph
{
public:
Graph();
~Graph();
int load(const std::string& parampath, const std::string& binpath);
int save(const std::string& parampath, const std::string& binpath);
int python(const std::string& pypath, const std::string& binpath);
int parse(const std::string& param);//没用
Operator* new_operator(const std::string& type, const std::string& name);
Operator* new_operator_before(const std::string& type, const std::string& name, const Operator* cur);
Operator* new_operator_after(const std::string& type, const std::string& name, const Operator* cur);
#if BUILD_PNNX
Operand* new_operand(const torch::jit::Value* v);
#endif
Operand* new_operand(const std::string& name);
Operand* get_operand(const std::string& name);
const Operand* get_operand(const std::string& name) const;
std::vector<Operator*> ops;
std::vector<Operand*> operands;
private:
Graph(const Graph& rhs);
Graph& operator=(const Graph& rhs);
};
Graph
的核心作用是管理计算图中的运算符和操作数。下面我们将对这两个概念进行说明:
Operator
类用来表示计算图中的运算符(算子),比如一个模型中的Convolution
, Pooling
等算子;
Operand
类用来表示计算图中的操作数,即与一个运算符有关的输入和输出张量;
Graph
类的成员函数提供了方便的接口用来创建和访问操作符和操作数,以构建和遍历计算图。同时,它也是模型中运算符(算子)和操作数的集合。
代码解读
Operator* Graph::new_operator_before(const std::string& type, const std::string& name, const Operator* cur)
{
Operator* op = new Operator;
op->type = type;
op->name = name;
ops.insert(std::find(ops.begin(), ops.end(), cur), op);
return op;
}
将元素 op
插入到容器 ops
中,插入的位置是在找到的第一个与 cur
相等的元素之前。如果没有找到相等的元素,op
就会被插入到容器的末尾。这种方式可以确保新的元素 op
被插入到容器中,并且尽量保持与 cur
相关的顺序。
ops.insert(std::find(ops.begin(), ops.end(), cur), op);
ops
是一个容器,可以是例如std::vector
或std::list
等容器类型。
std::find(ops.begin(), ops.end(), cur)
是一个查找算法,它在容器 ops
的开始迭代器(ops.begin()
)到结束迭代器(ops.end()
)之间寻找第一个等于 cur
的元素。这返回一个迭代器指向找到的元素,或者如果未找到,返回 ops.end()
。
ops.insert(iterator, op)
是插入算法,它在指定的位置插入元素。在这里,我们使用了 std::find
的结果作为插入位置的迭代器,即找到的元素的位置。
Operand* Graph::get_operand(const std::string& name)
{
for (Operand* r : operands)
{
if (r->name == name)
return r;
}
return 0;
}
const Operand* Graph::get_operand(const std::string& name) const
{
for (const Operand* r : operands)
{
if (r->name == name)
return r;
}
return 0;
}
这里为啥要写函数的常量版本形式???
需要注意的是,可以在非常量对象上调用常量成员函数,因为非常量对象的状态可以修改,所以调用常量成员函数不会引发冲突。而常量对象调用非常量成员函数,则会导致编译错误。
在C++中,你可以使用STL提供的 std::vector
的 ==
运算符来判断两个向量是否相等。这个运算符会逐元素比较两个向量的内容。
#include <iostream>
#include <vector>
int main() {
std::vector<int> vec1 = {1, 2, 3, 4, 5};
std::vector<int> vec2 = {1, 2, 3, 4, 5};
std::vector<int> vec3 = {1, 2, 3, 4, 6};
// 判断两个向量是否相等
if (vec1 == vec2) {
std::cout << "vec1 and vec2 are equal." << std::endl;
} else {
std::cout << "vec1 and vec2 are not equal." << std::endl;
}
if (vec1 == vec3) {
std::cout << "vec1 and vec3 are equal." << std::endl;
} else {
std::cout << "vec1 and vec3 are not equal." << std::endl;
}
return 0;
}
在上面的例子中,vec1
和 vec2
的内容相同,因此 vec1 == vec2
的比较结果为 true
,而 vec1
和 vec3
的内容不同,因此 vec1 == vec3
的比较结果为 false
。
需要注意的是,这种比较是逐元素进行的,所以两个向量要在每个位置上都具有相同的值才会被认为是相等。如果两个向量的大小不同,它们将被认为是不相等。如果你的向量中包含自定义类型,确保该类型有适当的 ==
运算符重载或提供自定义的比较函数。
int Graph::load(const std::string& parampath, const std::string& binpath)
{
std::ifstream is(parampath, std::ios::in | std::ios::binary);
if (!is.good())
{
fprintf(stderr, "open failed\n");
return -1;
}
StoreZipReader szr;
if (szr.open(binpath) != 0)
{
fprintf(stderr, "open failed\n");
return -1;
}
int magic = 0;
//从参数文件中读取第一行,解析并存储魔数(一个用于验证文件格式或版本的特殊标识符)
{
std::string line;
std::getline(is, line);
std::istringstream iss(line);
iss >> magic;
}
int operator_count = 0;
int operand_count = 0;
{
std::string line;
std::getline(is, line);
std::istringstream iss(line);
iss >> operator_count >> operand_count;
}
for (int i = 0; i < operator_count; i++)
{
std::string line;
std::getline(is, line);
std::istringstream iss(line);
std::string type;
std::string name;
int input_count = 0;
int output_count = 0;
iss >> type >> name >> input_count >> output_count;
Operator* op = new_operator(type, name);//nn.Linear,linear
/*为每个输入操作数,读取其名称,找到对应的 Operand 实例,
并更新 Operator 的输入列表 (inputs)。*/
for (int j = 0; j < input_count; j++)
{
std::string operand_name;
iss >> operand_name;
Operand* r = get_operand(operand_name);//operand_name是唯一的
r->consumers.push_back(op);
op->inputs.push_back(r);
}
/*
为每个输出操作数,创建新的 Operand 实例,并更新 Operator 的输出列表 (outputs)。
*/
for (int j = 0; j < output_count; j++)
{
std::string operand_name;
iss >> operand_name;
Operand* r = new_operand(operand_name);
r->producer = op;
op->outputs.push_back(r);
}
// key=value
while (!iss.eof())
{
std::string param;
iss >> param;
std::string key;
std::string value;
std::istringstream pss(param);
std::getline(pss, key, '=');
std::getline(pss, value);
if (key[0] == '@')
{
// attribute
load_attribute(op, key.substr(1), value, szr);
}
else if (key[0] == '$')
{
// operand input key
load_input_key(op, key.substr(1), value);
}
else if (key[0] == '#')
{
// operand shape
load_shape(op, key.substr(1), value);
}
else
{
// parameter
load_parameter(op, key, value);
}
}
}
return 0;
}
这个方法的目的是将网络结构和配置从文件中加载到内存中的 Graph
实例中。这涉及到创建运算符和操作数的实例,并根据文件中的数据设置它们的属性、形状和参数。关于load相关函数的作用见后面几个静态函数的详析。
int Graph::save(const std::string& parampath, const std::string& binpath)
{
FILE* paramfp = fopen(parampath.c_str(), "wb");
if (!paramfp)
{
fprintf(stderr, "fopen %s failed\n", parampath.c_str());
return -1;
}
StoreZipWriter szw;
if (szw.open(binpath) != 0)
{
fprintf(stderr, "open failed\n");
return -1;
}
// magic
fprintf(paramfp, "7767517\n");
// op count and oprand count
fprintf(paramfp, "%d %d\n", (int)ops.size(), (int)operands.size());
//对于每个运算符 op,写入其类型、名称、输入数量和输出数量
for (const Operator* op : ops)
{
fprintf(paramfp, "%-24s %-24s %d %d", op->type.c_str(), op->name.c_str(), (int)op->inputs.size(), (int)op->outputs.size());
//写入每个输入和输出操作数的名称
for (const Operand* oprand : op->inputs)
{
fprintf(paramfp, " %s", oprand->name.c_str());
}
for (const Operand* oprand : op->outputs)
{
fprintf(paramfp, " %s", oprand->name.c_str());
}
//遍历每个运算符的参数 (params) 和属性 (attrs),按照其类型将它们格式化写入参数文件
//对于属性,还会将相关数据写入二进制文件
for (const auto& it : op->params)
{
fprintf(paramfp, " %s=", it.first.c_str());
const Parameter& param = it.second;
if (param.type == 0)
{
fprintf(paramfp, "None");
}
if (param.type == 1)
{
if (param.b)
fprintf(paramfp, "True");
else
fprintf(paramfp, "False");
}
if (param.type == 2)
{
fprintf(paramfp, "%d", param.i);
}
if (param.type == 3)
{
fprintf(paramfp, "%e", param.f);
}
if (param.type == 4)
{
fprintf(paramfp, "%s", param.s.c_str());
}
if (param.type == 5)
{
fprintf(paramfp, "(");
for (size_t i = 0; i < param.ai.size(); i++)
{
fprintf(paramfp, "%d", param.ai[i]);
if (i + 1 != param.ai.size())
fprintf(paramfp, ",");
}
fprintf(paramfp, ")");
}
if (param.type == 6)
{
fprintf(paramfp, "(");
for (size_t i = 0; i < param.af.size(); i++)
{
fprintf(paramfp, "%e", param.af[i]);
if (i + 1 != param.af.size())
fprintf(paramfp, ",");
}
fprintf(paramfp, ")");
}
if (param.type == 7)
{
fprintf(paramfp, "(");
for (size_t i = 0; i < param.as.size(); i++)
{
fprintf(paramfp, "%s", param.as[i].c_str());
if (i + 1 != param.as.size())
fprintf(paramfp, ",");
}
fprintf(paramfp, ")");
}
}
for (const auto& it : op->attrs)
{
fprintf(paramfp, " @%s=", it.first.c_str());
const Attribute& attr = it.second;
fprintf(paramfp, "(");
for (int i = 0; i < (int)attr.shape.size() - 1; i++)
{
fprintf(paramfp, "%d,", attr.shape[i]);
}
if (attr.shape.size() > 0)
fprintf(paramfp, "%d", attr.shape[attr.shape.size() - 1]);
fprintf(paramfp, ")");
fprintf(paramfp, type_to_string(attr.type));
std::string filename = op->name + "." + it.first;
szw.write_file(filename, attr.data.data(), attr.data.size());
}
//如果运算符的 inputnames 与 inputs 的大小相同,遍历 inputnames 并将其写入文件
if (op->inputnames.size() == op->inputs.size())
{
for (size_t i = 0; i < op->inputs.size(); i++)
{
if (op->inputnames[i].empty())
continue;
const Operand* oprand = op->inputs[i];
fprintf(paramfp, " $%s=%s", op->inputnames[i].c_str(), oprand->name.c_str());
}
}
//遍历每个输入和输出操作数,写入它们的形状和类型
for (const Operand* oprand : op->inputs)
{
if (oprand->shape.empty())
continue;
fprintf(paramfp, " #%s=", oprand->name.c_str());
fprintf(paramfp, "(");
for (int i = 0; i < (int)oprand->shape.size() - 1; i++)
{
if (oprand->shape[i] == -1)
fprintf(paramfp, "?,");
else
fprintf(paramfp, "%d,", oprand->shape[i]);
}
if (oprand->shape.size() > 0)
{
if (oprand->shape[oprand->shape.size() - 1] == -1)
fprintf(paramfp, "?");
else
fprintf(paramfp, "%d", oprand->shape[oprand->shape.size() - 1]);
}
fprintf(paramfp, ")");
fprintf(paramfp, type_to_string(oprand->type));
}
for (const Operand* oprand : op->outputs)
{
if (oprand->shape.empty())
continue;
fprintf(paramfp, " #%s=", oprand->name.c_str());
fprintf(paramfp, "(");
for (int i = 0; i < (int)oprand->shape.size() - 1; i++)
{
if (oprand->shape[i] == -1)
fprintf(paramfp, "?,");
else
fprintf(paramfp, "%d,", oprand->shape[i]);
}
if (oprand->shape.size() > 0)
{
if (oprand->shape[oprand->shape.size() - 1] == -1)
fprintf(paramfp, "?");
else
fprintf(paramfp, "%d", oprand->shape[oprand->shape.size() - 1]);
}
fprintf(paramfp, ")");
fprintf(paramfp, type_to_string(oprand->type));
}
fprintf(paramfp, "\n");
}
fclose(paramfp);
return 0;
}
这段代码用来保存修改后图的结构和属性
PNNX中的运算符结构(Operator)
class Operator
{
public:
std::vector<Operand*> inputs;//输入的操作数
std::vector<Operand*> outputs;//输出的操作数
// keep std::string typed member the last for cross cxxabi compatibility
std::string type;//算子类型,eg:pnnx.Input
std::string name;//算子名称,eg:pnnx_input_0
std::vector<std::string> inputnames;
std::map<std::string, Parameter> params;//"bias":"True","in_feature":"32"...
std::map<std::string, Attribute> attrs;//存储算子的具体数值
};
在PNNX中,Operator
用来表示一个算子,它由以下几个部分组成:
inputs
:类型为std::vector<operand>
, 表示这个算子在计算过程中所需要的输入操作数operand
;
outputs
:类型为std::vector<operand>
, 表示这个算子在计算过程中得到的输出操作数operand
;
type
和name
类型均为std::string
, 分别表示该运算符号的类型和名称;
inputnames
:存储与 inputs
中的每个 Operand
对应的字符串名称。这些名称是用来标识和引用特定的输入操作数的。在神经网络和其他计算图中,运算符(比如一个神经网络层或一个数学操作)通常会有多个输入。inputnames
提供了一种方式来命名这些输入,使得在处理或调试网络时可以更容易地引用和识别它们。
params
, 类型为std::map
, 用于存放该运算符的所有参数(例如卷积运算符中的params
中将存放stride
, padding
, kernel size
等信息);
attrs
, 类型为std::map
, 用于存放该运算符所需要的具体权重属性(例如卷积运算符中的attrs
中就存放着卷积的权重和偏移量,通常是一个float32
数组)。
PNNX中的操作数(Operand)结构
class Operand
{
public:
void remove_consumer(const Operator* c);
Operator* producer;//该操作数是某个算子的output
std::vector<Operator*> consumers;//该操作数是某个算子的input
// 0=null 1=f32 2=f64 3=f16 4=i32 5=i64 6=i16 7=i8 8=u8 9=bool 10=cp64 11=cp128 12=cp32
int type;
std::vector<int> shape;
// keep std::string typed member the last for cross cxxabi compatibility
std::string name;
std::map<std::string, Parameter> params;//没看到在源码中使用
};
PNNX中的Attribute和Param结构
在PNNX中,**权重数据结构(Attribute)和参数数据结构(Param)**定义如下。它们通常与一个运算符相关联,例如Linear
算子的in_features
属性和weight
权重。
class Parameter
{
public:
Parameter()
: type(0)
{
}
Parameter(bool _b)
: type(1), b(_b)
{
}
Parameter(int _i)
: type(2), i(_i)
{
}
Parameter(long _l)
: type(2), i(_l)
{
}
Parameter(long long _l)
: type(2), i(_l)
{
}
Parameter(float _f)
: type(3), f(_f)
{
}
Parameter(double _d)
: type(3), f(_d)
{
}
Parameter(const char* _s)
: type(4), s(_s)
{
}
Parameter(const std::string& _s)
: type(4), s(_s)
{
}
Parameter(const std::initializer_list<int>& _ai)
: type(5), ai(_ai)
{
}
Parameter(const std::initializer_list<int64_t>& _ai)
: type(5)
{
for (const auto& x : _ai)
ai.push_back((int)x);
}
Parameter(const std::vector<int>& _ai)
: type(5), ai(_ai)
{
}
Parameter(const std::initializer_list<float>& _af)
: type(6), af(_af)
{
}
Parameter(const std::initializer_list<double>& _af)
: type(6)
{
for (const auto& x : _af)
af.push_back((float)x);
}
Parameter(const std::vector<float>& _af)
: type(6), af(_af)
{
}
Parameter(const std::initializer_list<const char*>& _as)
: type(7)
{
for (const auto& x : _as)
as.push_back(std::string(x));
}
Parameter(const std::initializer_list<std::string>& _as)
: type(7), as(_as)
{
}
Parameter(const std::vector<std::string>& _as)
: type(7), as(_as)
{
}
#if BUILD_PNNX
Parameter(const torch::jit::Node* value_node);
Parameter(const torch::jit::Value* value);
#endif // BUILD_PNNX
static Parameter parse_from_string(const std::string& value);
// 0=null 1=b 2=i 3=f 4=s 5=ai 6=af 7=as 8=others
int type;
// value
bool b;
int i;
float f;
std::vector<int> ai;
std::vector<float> af;
// keep std::string typed member the last for cross cxxabi compatibility
std::string s;
std::vector<std::string> as;
};
bool operator==(const Parameter& lhs, const Parameter& rhs);
class Attribute
{
public:
Attribute()
: type(0)
{
}
#if BUILD_PNNX
Attribute(const at::Tensor& t);
#endif // BUILD_PNNX
Attribute(const std::initializer_list<int>& shape, const std::vector<float>& t);
// 0=null 1=f32 2=f64 3=f16 4=i32 5=i64 6=i16 7=i8 8=u8 9=bool
int type;
std::vector<int> shape;
std::vector<char> data;//将从压缩包读取到的数据存储下来
};
bool operator==(const Attribute& lhs, const Attribute& rhs);
// concat two attributes along the first axis
Attribute operator+(const Attribute& a, const Attribute& b);
代码解读
Attribute::Attribute(const std::initializer_list<int>& _shape, const std::vector<float>& t)
{
type = 1;
shape = _shape;
if (shape.size() > 0)
{
int size = shape[0];
for (size_t i = 1; i < shape.size(); i++)
{
size *= shape[i];
}
data.resize(size * type_to_elemsize(type));
memcpy((void*)data.data(), (const void*)t.data(), data.size());
}
}
主要实现了,给定任意shape的数据t,t是float类型的vector,把t存到Attribute对象的data中
Attribute operator+(const Attribute& a, const Attribute& b)
{
Attribute c;
if (a.type != b.type)
{
fprintf(stderr, "concat attribute type mismatch\n");
return c;
}
if (a.shape.size() != b.shape.size())
{
fprintf(stderr, "concat attribute shape rank mismatch\n");
return c;
}
for (int i = 1; i < (int)a.shape.size(); i++)
{
if (a.shape[i] != b.shape[i])
{
fprintf(stderr, "concat attribute shape mismatch\n");
return c;
}
}
c.type = a.type;
c.shape = a.shape;
c.shape[0] += b.shape[0]; // concat the first dim
c.data.resize(a.data.size() + b.data.size());
memcpy(c.data.data(), a.data.data(), a.data.size());
memcpy(c.data.data() + a.data.size(), b.data.data(), b.data.size());
return c;
}
重写了+号运算符,主要将Attribute
对象沿着第一个维度shape[0]
进行拼接,这里Attribute
对象除了第一个维度外,其他维度上都要相等。
Parameter Parameter::parse_from_string(const std::string& value)
{
Parameter p;
p.type = 0;
if (value == "None" || value == "()" || value == "[]")
{
return p;
}
if (value == "True" || value == "False")
{
// bool
p.type = 1;
p.b = value == "True";
return p;
}
// 判断字符串 `value` 的第一个字符是不是 '(' 或 '['
if (value[0] == '(' || value[0] == '[')
{
// list
std::string lc = value.substr(1, value.size() - 2);
/*
使用 `std::istringstream`,代码将字符串 `lc` 转换为一个字符串流 `lcss`,
然后使用 `while` 循环和 `std::getline` 函数来逐个解析列表中的元素。元素之间以逗号 (',') 分隔。
*/
std::istringstream lcss(lc);
while (!lcss.eof())
{
std::string elem;
std::getline(lcss, elem, ',');
/*
如果元素的第一个字符不是数字或负号('-'),或者即使是负号,其后的字符也不是数字,则认为该元素是字符串。
*/
if ((elem[0] != '-' && (elem[0] < '0' || elem[0] > '9')) || (elem[0] == '-' && (elem[1] < '0' || elem[1] > '9')))
{
// string
p.type = 7;
p.as.push_back(elem);
}
// 如果元素中包含点号 ('.') 或 'e'(表示科学计数法),则认为该元素是浮点数。
else if (elem.find('.') != std::string::npos || elem.find('e') != std::string::npos)
{
// float
p.type = 6;
p.af.push_back(std::stof(elem));
}
else
// 如果上述条件都不满足,则认为元素是整数
{
// integer
p.type = 5;
p.ai.push_back(std::stoi(elem));
}
}
return p;
}
这段代码的主要作用是解析一个字符串 value
,并根据其内容向不同类型的数组中添加元素
配合load_parameter
这个静态函数使用
static void load_parameter(Operator* op, const std::string& key, const std::string& value)
{//bias=True in_features=32 out_features=128
op->params[key] = Parameter::parse_from_string(value);
}
回顾C++std::string相关操作
substr
是 C++ 标准库中 std::string
类的一个成员函数,用于从一个字符串中提取子串:
std::string substr(size_t pos = 0, size_t count = npos) const;
count
:表示子串的长度(要提取的字符数),默认为 npos
,即直到字符串的末尾。
这函数返回一个新的 std::string
对象,包含原始字符串中指定位置和长度的子串。
std::string lc = value.substr(1, value.size() - 2);
这行代码用于从字符串 value
中提取子串,起始位置为 1
,长度为 value.size() - 2
。
处理行内格式化数据: 当处理像CSV(逗号分隔值)这样格式化的字符串时,std::istringstream
可以结合std::getline
使用,以自定义分隔符读取数据。
cppCopy codestd::string line = "John,Doe,30";
std::istringstream iss(line);
std::string token;
while (std::getline(iss, token, ',')) {
// 处理每个 token
}
std::istringstream
是 C++ 标准库中的一个类,用于从字符串中提取数据。它的头文件是 <sstream>
。
#include <iostream>
#include <sstream>
#include <string>
int main() {
// 创建一个字符串流对象
std::string data = "123 45.67 Hello";
std::istringstream iss(data);
// 从字符串流中提取数据
int intValue;
float floatValue;
std::string stringValue;
iss >> intValue >> floatValue >> stringValue;
// 输出提取的数据
std::cout << "Integer: " << intValue << std::endl;
std::cout << "Float: " << floatValue << std::endl;
std::cout << "String: " << stringValue << std::endl;
return 0;
}
std::istringstream
还可以用于错误检测。如果读取失败(例如,因为数据类型不匹配),流将进入错误状态,这可以通过检查流状态或者直接在条件表达式中使用流对象来检测:
std::string input = "123 abc";
std::istringstream iss(input);
int num;
if (iss >> num) {
std::cout << "Read integer: " << num << std::endl;
} else {
std::cerr << "Error: Expected an integer" << std::endl;
}
std::getline
是 C++ 标准库中的一个函数,用于从输入流中读取一行数据。它的头文件是 <string>
。
std::getline
可以用于从 std::istream
(比如 std::cin
)或者字符串流(比如 std::istringstream
)中读取一行数据,并存储到一个字符串中。它可以指定一个定界符(默认是换行符 ),当读取到定界符时,输入就结束。
以下是 std::getline
的基本用法:
#include <iostream>
#include <string>
int main() {
std::string line;
// 从标准输入中读取一行
std::cout << "Enter a line of text: ";
std::getline(std::cin, line);
// 输出读取到的行
std::cout << "You entered: " << line << std::endl;
return 0;
}
指定定界符
可以指定一个定界符,告诉 std::getline
在何时停止读取。
#include <iostream>
#include <string>
int main() {
std::string line;
// 从标准输入中读取以逗号分隔的数据
std::cout << "Enter comma-separated values: ";
std::getline(std::cin, line, ',');
// 输出读取到的行
std::cout << "You entered: " << line << std::endl;
return 0;
}
在这个例子中,std::getline
会在遇到逗号时停止读取输入。
(elem[0] < '0' || elem[0] > '9')
:检查字符串 elem
的第一个字符是否不是数字字符(即小于 '0' 或大于 '9')。
std::string::find
是 C++ 标准库中 std::string
类的成员函数,用于在字符串中查找子字符串或字符的第一个出现位置。它返回子串在原始字符串中的位置,如果未找到,则返回 std::string::npos
。
#include <iostream>
#include <string>
int main() {
std::string str = "Hello, World!";
std::string substring = "World";
size_t found = str.find(substring);
if (found != std::string::npos) {
std::cout << "Substring found at position: " << found << std::endl;
} else {
std::cout << "Substring not found." << std::endl;
}
return 0;
}
指定搜索的起始位置
std::string::find
还允许你指定搜索的起始位置,这对于多次查找很有用:
#include <iostream>
#include <string>
int main() {
std::string str = "abracadabra";
std::string substring = "ra";
size_t found = str.find(substring); // 从头开始查找
while (found != std::string::npos) {
std::cout << "Substring found at position: " << found << std::endl;
found = str.find(substring, found + 1); // 从上一个找到的位置的下一个位置开始查找
}
return 0;
}
在这个例子用于从字符串 str
中查找所有的 "ra" 子串。每次找到一个后,更新搜索的起始位置为上一个找到的位置的下一个位置。
std::string::find_last_of
是 C++ 标准库中 std::string
类提供的一个成员函数,它用于从字符串的末尾开始搜索,查找在指定的字符集中任何一个字符最后一次出现的位置。
查找单个字符: 查找单个字符最后一次出现的位置。
std::string str = "Hello, world!";
size_t pos = str.find_last_of('o'); // 查找 'o' 最后一次出现的位置
查找多个字符中的任何一个: 查找字符串中给定的多个字符中的任何一个最后一次出现的位置。
std::string str = "example.com";
size_t pos = str.find_last_of("aeiou"); // 查找 'a', 'e', 'i', 'o', 'u' 中的任何一个字符最后一次出现的位置
指定起始位置: 从字符串中的特定位置开始向前搜索**(从该位置向字符串开头方向搜索)**。
std::string str = "Hello, world!";
size_t pos = str.find_last_of('o', 5); // 从位置 5 开始向前查找 'o' 最后一次出现的位置
返回值
如果找到了字符,find_last_of
返回字符在字符串中的位置(一个基于 0 的索引)。
如果没有找到字符,函数返回 std::string::npos
,这是 size_t
类型的一个特殊值,通常定义为最大的 size_t
值。
注意事项
当处理 find_last_of
的返回值时,应该检查它是否不等于 std::string::npos
,以确认是否真的找到了字符。
几个静态函数
static void load_shape(Operator* op, const std::string& key, const std::string& value)
{//key = 0,value = (1,32)f32
Operand* operand = 0;
for (auto r : op->inputs)
{
if (r->name == key)
{
operand = r;
break;
}
}
if (!operand)
{
for (auto r : op->outputs)
{
if (r->name == key)
{
operand = r;
break;
}
}
}
if (!operand)
{
fprintf(stderr, "no such operand %s for operator %s\n", key.c_str(), op->name.c_str());
return;
}
// type
//设置操作数类型
std::string typestr = value.substr(value.find_last_of(')') + 1);
operand->type = string_to_type(typestr.c_str());
// shape
//从 value 字符串中提取形状数据,该数据位于第一个 ( 和最后一个 ) 之间。
std::string lc = value.substr(1, value.find_last_of(')') - 1);
std::istringstream lcss(lc);
operand->shape.clear();
while (!lcss.eof())
{
std::string elem;
std::getline(lcss, elem, ',');
if (elem == "?")
{
operand->shape.push_back(-1);//往末尾添加-1
}
else
{
int i = std::stoi(elem);
operand->shape.push_back(i);
}
}
}
主要作用是解析字符串 value
,以更新一个特定 Operator
的 Operand
的类型和形状信息。
static void load_attribute(Operator* op, const std::string& key, const std::string& value, StoreZipReader& szr)// bias (128)f32
{
Attribute& a = op->attrs[key];
// type
std::string typestr = value.substr(value.find_last_of(')') + 1);
a.type = string_to_type(typestr.c_str());
if (a.type == 0)
return;
// shape
std::string lc = value.substr(1, value.find_last_of(')') - 1);
std::istringstream lcss(lc);
a.shape.clear();
while (!lcss.eof())
{
std::string elem;
std::getline(lcss, elem, ',');
int i = std::stoi(elem);
a.shape.push_back(i);
}
if (a.shape.empty())
return;
// weight_data
//计算属性的总大小 (`size`), 通过将所有维度的大小相乘得到.
size_t size = 1;
for (int i : a.shape)
{
size *= i;
}
//根据类型和总大小计算字节大小 (`bytesize`).
size_t bytesize = size * type_to_elemsize(a.type);
std::string filename = op->name + "." + key;
//从 `StoreZipReader` 对象 (`szr`) 中获取与属性关联的文件的大小 (`filesize`).
size_t filesize = szr.get_file_size(filename);
//如果文件大小为 `0` 或不匹配预期的字节大小,函数将打印错误信息并进行适当的处理
if (filesize == 0)
{
// no such file
return;
}
if (filesize != bytesize)
{
fprintf(stderr, "file size not match expect %lu but got %lu\n", bytesize, filesize);
}
a.data.resize(bytesize);
szr.read_file(filename, (char*)a.data.data());
}
用于从压缩包中加载特定运算符的属性,包括属性的类型、形状和数据。
static void load_input_key(Operator* op, const std::string& key, const std::string& value)
{
op->inputnames.resize(op->inputs.size());
for (size_t i = 0; i < op->inputs.size(); i++)
{
const Operand* oprand = op->inputs[i];
if (oprand->name == value)
{
op->inputnames[i] = key;
break;
}
}
}
在运算符的输入操作数中查找一个名称与 value
匹配的操作数,并将该操作数在 op->inputnames
中的位置设置为 key
。这样,可以根据 key
来引用特定的输入操作数。
参考
https://zhuanlan.zhihu.com/p/655247558(墙裂推荐!!!一个十分优质的项目)
https://github.com/Tencent/ncnn/tree/master/tools/pnnx